
 On occasion during the dry-land rope portion of some swiftwater rescue courses I like to introduce vertical rope options. After demonstrating how to ascend a rope with a prusik and rappel with a muenter, I caution students saying,“Make sure you know how to properly tie a munter and be well-versed on the ground as to how to switch from your tight prusik to the munter in order lower back down.” Then I’ll jokingly add, “or keep a knife hand and pre-plan a soft landing.” This is usual good for a few laughs or at least a couple of smiles. Occasionally I’ll add, “at a very minimum, take a cell phone with you and I can talk you through the transition…”
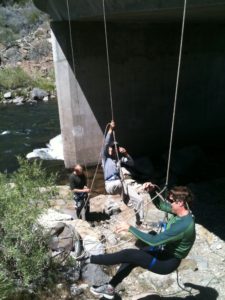
Here’s the rundown on minimal gear rope ascension and rappelling. It is a useful skill for boaters during portage or for times when the obvious access methods aren’t an option. So many times we get tunnel vision on the horizontal (river-level) access, and forget about the vertical options.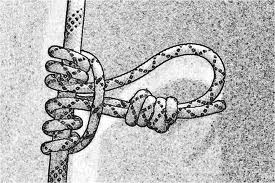
You all remember the rope climb from middle school; big rope, hands and feet, and a lot of effort? Thats the idea here but we get to add a progress capture device. Enter the prusik hitch. The prusik will travel up the rope with you and will ‘catch’ if you slip, as well as capture our progress up the rope (make sure it is tied to the rope you’re climbing and clipped to the carabiner on your improvised harness).
 If your feet have purchase on the ground they provide the force that lets you move up the rope. If you are in the vertical, then you need a way to take tension off the prusik you are hanging from so you can slide it up the rope. There are a few ways to do this. The most basic is to grab the rope below your prusik and wrap it around one of your feet a few times. As you stand up in this loop your prusik is loosened and you can slide it up the rope. Continue until you reach the top of the rope.
The second option is to attach a second prusik to the rope below the one attached to your harness, and stand in that prusik. As you stand, slide the prusik attached to your harness up the rope, then move your foot loop as well. Thus you ascend so on and so forth till you reach the top. Show that to your gym coach, just hope he doesn’t ask you to pass the knot. [patience young jedi, next lesson]
So there you are at the top of the rope, no knife, no soft landing, no cell phone, no ladder. Luckily you remembered how to tie your muenter. Here’s the crux. Once you tie your muenter and clip it to your harness, You need to take tension off your prusik so you can transition your weight to the muenter enabling you to rappel down the rope. I’d recommend doing this numerous times on the ground or with a partner who can lower you till you master this step. Once the prusik is loosened you can lower your self to the ground. Dont forget to mind the prussik on your way down. That is to say grab in with your opposite (non brake) hand and slide the hitch down the rope as you descend. Not to fast, fast is hot, hot + rope = bad.
Another trick for your tool belt. This technique can help you or a friend of of a tight spot, or can let you access someone/ something from above or below. Minimum Gear required: 1 length of webbing long enough to make a harness. One carabiner (to attach your improvised harness, and attach your prussik and or your munter hitch to your rope. A long strong length of rope to ascend / descend.