Tag Archives: rescue

To Scout or Not to Scout: How to Make the Call

P1010514

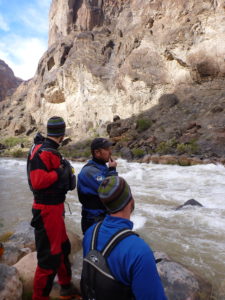
When the discussion of a rapid scout comes up, Students in our courses frequently ask for clarification, hoping to better understand the judgement behind the call to stop and scout, or to run an upcoming rapid.  The question usually goes like, “How do you know when to scout and when not to?  Its not like you can scout EVERYTHING you run every time…”
While scouting every rapid every time is an impossibility, experienced paddlers will regularly stop and scout some rapids, while just jumping into others.  The decision is not always an easy one, but here are five thought paths to consider when making the call to stop and scout or to go for it:
1)  When was the last time you were down the run?  Do you know the rapids?  How do they compare to your skill level and the skills of the other paddlers you are with?  Can you self-rescue or help others in case of emergency?
2)  Is there any reason to believe things may have changed since the last time you were down?  Has there been high water, low water or any recent changes you know of?  Is there potential for wood, debris or other river hazards to have accumulated in a particular “hazard” spot?

IMGP4285

3)  Do you know of others who have been running the river recently?  Have those boaters reported changes or new hazards?  Did they have “clean” runs?  Or did they report new hazards or unexpected challenges?
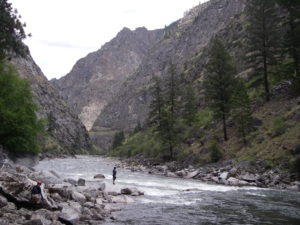
4)  Can you see the rapid from top to bottom and visualize a clear line or is the view obstructed and you cannot see past the first move?  Can you see an eddy partway down where you can visually inspect further downstream?  Does that eddy have “an out” if you determine from there that the rest of the rapid is too big/ dangerous/ full of hazards/ a portage?
5)  Is this a river or rapid that has a known hazard spot or tendency to change with different flows/ levels?  Are you prepared to manage those hazards in case of the unexpected?  How well do you know the river or rapids at the level you are running it on that day?
 IMGP (133)
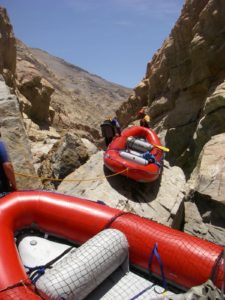
Bottom line:  When in doubt, it is best to get out and scout! It is always better to scout and wish you had not, than to be in the middle of a rapid wishing you had scouted.  Happy padding and play safe from Sierra Rescue!!

Mechanical Advantage Challenge

Time to put on those thinking caps. I’ve drawn up a few sketches of mechanical advantage systems to test your brains today. Perhaps you’ve been following our #weeklyMA on facebook and twitter. If so, you’ll have a head start. In the sketches below, the anchor and load sides have been identified, pulleys are represented by the color orange, the hauling line is blue, anchors are red and prusik attachments are pink. Give your best guess as to the mechanical advantage generated in each sketch.  Good luck. If you are stumped scroll down to the bottom for some hints followed by the answers.

#1 2-1

#1

#2 9-1

#2

#3 5-1

#3

#4 5-1 complex

#4

#5

#5

#6

#6

# 7 13-1 complex

#7

Hopefully you never have set up some of the above systems. Why not? Because MA is a dangerous tool. You can quickly exceed the safety margins of the equipment in the system if you don’t properly understand the system you created and the power it has. As a rule, never exceed a 12:1 MA ratio. That means no more than 12 people pulling on a fixed rope, no more than 6 people hauling a 2:1, 4 and a 3:1 and so on. Have a good understanding of the simple MA systems; 1:1, 2:1, 3:1 and 4:1 pig rig. Are there times when you intentionally set up larger more complex systems? Perhaps, but ask yourself why and make sure you aren’t exceeding your limits.

Dont forget about two mandatory safety steps in any system.

1) Add a final change of direction at the anchor so your direction of pull keeps you out of the ‘line of fire.’ If there is failure it will travel in line with the load toward the anchor. The final change of direction keeps you further from harms way.

2) When possible attach a damper on the haul line as close to the load as possible. Should failure occur, this weighted damper will change the trajectory of the flying equipment, ideally it will hit the ground or water before it hits you.

Mechanical Advantage in review:

By itself, a pulley does nothing more than change direction and reduce friction. When utilized against an anchor or in conjuction with other pulleys Remember when calculating MA, you are calculating the advantage created on the load against the anchor. Pulleys that don’t move, do not create mechanical advantage. You can assume that pulleys attached to the anchor aren’t moving and thus don’t contribute to the mechanical advantage created with respect to the load.

A quick review of the three types of mechanical advantage:

Simple Mechanical Advantage: one or more pulleys travelling at the same speed in the same direction

Compound Mechanical advantage: two or more pulleys travelling in the same direction at different rates

Complex Mechanical advantage: Two or more pulleys travelling in the opposite direction at potentially different rates

Here’s a link that might help further your understanding of mechanical advantage:

http://www.ropebook.com/information/pulley-systems

Ok here’s the answers: 
1) 2:1
2) 9:1
3) 5:1
4) complex 5:1
5) 3:1
6) compound 6:1
7) complex 13:1

Swimming in Whitewater: What Suzie the Swim Coach Forgot to Mention

As whitewater boaters, our goal should always be to stay on line, and keep ourselves, and everyone else IN their boat(s).  A swim can be much more strenuous and dangerous than we expect, and can not only lead to exhaustion and hypothermia, but also puts us right on top of all the hidden obstacles just under the water.  It should always be our priority to avoid unplanned swims.

Swimmer!

Unfortunately, we are not perfect, and often times the little bump on the rock, losing a paddle, or a big wave sends us on an unplanned swim into whitewater.  When this happens, our strategy, and that of our companions, becomes critical, and can mean the difference between a pleasant, or very unpleasant, rest of the day.  Having a strategy is critical.  Here are some tips to keep in mind when Swimming in Whitewater.

Know before you swim:  Have a picture in your mind of the rapid, and where things may go wrong so you will have a strategy.  Rafters are generally better off on top of, or in their boats. Have a plan. If you can’t swim out, don’t run the rapid unless you KNOW you will stay in the boat.

Ball up: When you are falling from an IK, raft or Cat boat; or going over a drop, Keep your feet close into your body, so you will not be tempted to push off the bottom, and thus minimize the chance to entrap one of your limbs.

Get out of the water as fast as you can:  It is hard to see, and easier to get snagged on underwater obstacles.

When swimming: Conserve energy and use strategy, do not allow yourself to get more winded. Basic mind set: Swim smarter not harder.

-The leg muscles use lots of oxygen!  Consider only using your arms for movement.

-Look where you are going, and pay attention to your angle.

-At higher water flows, you will need to swim more aggressively to get across eddy lines.  This is where a technique like the “barrel roll” can keep you on the surface and keep your momentum going.

Rescue:

Be prepared – For self rescue, but this is the time where everyone needs to be ready to react. Being in the right place with the right skills may be the only thing that assists someone out of the water.

Choose Wisely – Boat with folks that will know you are in the water, and are doing everything they can to safely assist you, and others, in getting out of the water.

River Safety Essentials from Tren Long

One of the most common questions I get, as a rescue instructor is: “What should I take with me on the water?”

This can be a very difficult question to answer on paper because I like my students to learn through the course of our weekend exactly what they need, but there are some fundamentals that should be covered.

Throw Bag – a good rule of thumb is one throw bag per boat.  The type of boat you paddle often dictates what size rope you use in your throw bag; rafts carrying the larger diameter rope in longer lengths and kayakers carrying shorter thinner line to save space.  What is important to note about your throw bag is if you plan to use it as a haul line for mechanical advantage your brake prussic must be 2/3 or less the diameter of your haul line.

Haul line – If a boat gets wrapped you need a line to encourage the movement needed to get it off the rock.  This becomes very boat specific as kayaks can often use much smaller diameter rope as there is less water pressure on the smaller rigid hull.  Rafts have been pulled off rocks using throw bags but I recommend especially for multiday trips having 150-200 feet of 3/8-inch static line.954835_543961018999656_896179722_n

Carabiners – These tools make rope attachment a breeze, how many do you need?  For kayakers 2 per person is great, for rafters 3-4 per boat.  They must be locking carabiners, as unintentional clip-ins can be a very bad thing.

Prusik – To setup an efficient MA system you will need at least 2 prussic.  You can loop 2 short prussic and wear them around your waist or easily fit them in your lifejacket. 1-2 sets of prussic per group should be the norm.  Most important is that your prussic line is 2/3rd or less the diameter of your haul line!

Pulleys – Again following in the goal of efficient work the minimum of 1 prussic minding pulleys will make your life and rescue easier.  One per person in Kayaks is great and 2 per raft are ideal.

Knife – A good sharp river knife is important not only to cut tomatoes at lunch but could potentially save your life if you are bound in a rope in the water.  We do not use our knives to cut people out of pinned kayaks!  We do use them as a last resort to cut a rope if absolutely needed.

Webbing – Lastly and most often overlooked is webbing.  Depending on your river corridor anchors may be bountiful or hard to find but having enough webbing can overcome many obstacles.  I recommend 30ft per person kayakers and 80 feet per raft.  You can cut it how you like; I shoot for 15-20 feet per sling.

Is this a lot of gear? It depends on if you need it or not.  I can fit an entire wrap kit with a haul line in a container the same size as a 12 pack of beer, so what is more important on that 5 day trip, beers or being able to get your raft off that rock?

This is by no means an exhaustive list of what you need on the water, each group, each river, and each skill set dictates different equipment this is just some general guidelines I have found helpful for rafters and kayakers.

Post by: Tren Long, Instructor

Train Hard. Stay Safe. Kayak Specific River Rescue

OLYMPUS DIGITAL CAMERAClearly we are proponents of swiftwater rescue, not only because it is our livelihood, but because we believe that a well-trained boaters correspond to safer boaters, and safer boaters are less likely to need rescue. See the cycle? We are avid proponents of prevention. The best rescue is the one that never has to happen. Stay on top of your swiftwater skills, and better than than that,  train with the people you paddle with.

At Sierra Rescue we offer custom courses just for you and your boating group. Our River Rescue Certification (RRC) has had great success in the last 5 years and we have taken it a step further to offer the RRC-K; River Rescue Certification – Kayak Specific. In the course we take the basic RRC format and put a kayaker’s spin on it. It involves the same hands on scenario-based training, but emphasizes boat-based rescue  and self rescue for a kayaker, advanced pins and entrapments, and rope techniques using the gear in a personal pin kit. Running scenarios with the people who have your back on the water not only helps prepareOLYMPUS DIGITAL CAMERA the group for those “what ifs,” but lets you problem solve with one another and see each others rescue abilities.


Last year we taught numerous RRC-K with great response. Students really seemed to enjoy responding to scenarios from their boats, and and being able use the benefits of a kayak in a rescue. This article, written by CCK instructor Bryant Burkhadt, touches on the progression of swiftwater rescue training and the importance of continued training while discussing the benefits of a kayaker-specific course for boaters.

http://playak.com/news.php?idd=2337568845922

Thanks Bryant, see you on the water.OLYMPUS DIGITAL CAMERA

Post by: Zach Byars, Instructor


10 Tips for a Smooth Grand Canyon Trip

The mother of all multi-day river trips in the United States might be the Colorado River through the Grand Canyon.  Nowhere else can you get huge rapids, beautiful scenery, 20+ days in a remote river environment and amazing side adventures the whole way.  It really is amazing, and one of my personal favorite places to be in the entire world!

The author rows a gear boat through massive waves at Hermit Rapids.  The waves here have been known to be big enough to flip boats that don’t hit the waves straight on.

The author rows a gear boat through massive waves at Hermit Rapids. The waves here have been known to be big enough to flip boats that don’t hit the waves straight on.

That being said, an adventure of this scale has many risks involved.  I was lucky to go on my first Colorado River adventure with very experienced guides and people who love and care about the river and having great experiences.  Our adventure wasn’t without injuries or difficulty.  Our group was separated in a side canyon by a flash flood, one person was injured and required evacuation out of Upper Elves Chasm, one got heat exhaustion while on a hike and we had a few other smaller injuries.

From all of this, I learned some valuable lessons that can be used anywhere in the world on any adventure, but are particularly relevant to rescue and safety in the Grand Canyon:

1)   Have a trip leader who has experience in the Grand Canyon.  This will make everyones’ trip safer and better all around from their experience and good judgment.

2)  If the group splits to do a hike or other activity, make sure each remaining group has a “leader” or a plan for contingencies.

3)  Make sure the boats are tied up high and far from the edge of the river, and with multiple points at camp so they cannot float away even if the river went up 10k CFS overnight!

4)  “Raft” the boats together at camp by using short straps to rig each one side by side.  This creates a solid platform to load/ unload and minimizes injuries at camp on rafts.

A flash flood splits a group that was hiking Shinamu Wash near Bass Camp.  You can see victims stranded on the river left wall, as well as rescuers on river right.

A flash flood splits a group that was hiking Shinamu Wash near Bass Camp. You can see victims stranded on the river left wall, as well as rescuers on river right.

5)  Always keep the rafts together when on the river.  Keep others close by through rapids incase there is a rescue needed.  Divide your boats and equipment so things are relatively even weighted through the larger rapids.

6)  Rig to flip every day!  Even the smaller rapids in the Colorado can pack a big punch with large waves and powerful hydraulics!

7)  If its raining, or even a little cloudy in the sky, stay out of the side canyons.  Even canyons that are not prone to flash flooding can go up in and instant.  On multiple occasions I have seen the devastation of flooding and know how dangerous it can be to be stuck in one.

Trip members work together to evacuate a victim out of Upper Elves Chasm.  The rescue took more than two hours and involved moving an incapacitated victim down steep, rocky terrain and under rocky shelves like the one in the photo.  A paco pad and rope were essential to this rescue.

Trip members work together to evacuate a victim out of Upper Elves Chasm. The rescue took more than two hours and involved moving an incapacitated victim down steep, rocky terrain and under rocky shelves like the one in the photo. A paco pad and rope were essential to this rescue.

8)  Bring extra supplies like rope, a climbing harness, and rigging gear.  This is very helpful for exploring side canyons, and can be invaluable in a rescue situation.

9)  Always take water if you’re going more than 100 feet from the river.  The canyon is hot and unforgiving, especially to those who are not well prepared!

10)  Small medical needs like cuts, scrapes, bruises and dry skin can become big medical needs if not addressed as soon as they arise.  Take time to take care of these things as you go, and have a great trip down the canyon!

WAFA with HRR: Springtime in the Grand Canyon –

WAFA- Wilderness Advanced First Aid  with the  HRR – Hualapai River Runners in Peach Springs, AZ

Abi and I drove the Sierra Rescue rig down through Nevada across the Colorado River at Hoover Dam and into Peach Springs, AZ for two weeks of wilderness advanced first aid (WAFA) and swiftwater rescue training with the Hualapai River Runners. We’ve been running trainings for the Hualapai for quite some time now, and its always good to get back to the big ditch.

HRR WAFA  group shot

The group showing off their hypo wraps

WAFA: The group inside the warehouse, after arts and crafts with splints

The group inside the warehouse, after arts and crafts with splints

Wilderness first aid hypothermia wrap

All bundled up and warm in the hypo-wrap

WAFA skill: reducing a shoulder

That’s one way i wouldn’t advise reducing a shoulder

It was a great four days of WAFA (Wilderness Advanced First Aid Training). On the fourth day we finished the class with a big mass causality  incident involving a simulated train vs buss collision. Trauma! Moulage! Fun! Students had to triage and figure out some difficult extractions from the broken down bus where we staged the scenario. Weather was great, a gave us the first taste of spring.  Julie and Zach swapped places and Julie will join Abi along with a few flagstaff locals for the swiftwater rescue portion of the course which will involve 2 days of on-site  training and a downriver overnight from Diamond Creek to Pierce Ferry.  Load up those big blue pontoons and have a some fun!

Wilderness First Aid and Swiftwater Rescue with the Hoopa tribe

All 20 atop the raft

The USCG recommended passenger load may have been exceeded for this group shot! All 20 students atop the raft, on day two after a really fun day of swiftwater training. The Trinity River was flowing around 1100 CFS and made Hawkins Bar an ideal training site. Some fun features, and good challenging cross-river swims!

We had yet another great week of Wilderness First Aid and Swiftwater Rescue training up on the Trinity River with the TCCC of the Hoopa Tribe. We at Sierra Rescue have been doing a combination Wilderness First Aid / Survival and Swiftwater Rescue Course up in Hoopa for over 10 years now. Day one was all first-aid focused and the wounds lab and splinting lab were highlights as usual. Fun to see the students improvising in the wilderness setting. We spent the evening of the first day building survival shelters and running hands on wilderness first aid scenarios.  It was great to watch the students thinking  through the variety of problems we threw at them.

wilderness first aid; upper extremity splint

Wilderness First Aid Arts and Crafts: splint building. Building a splint in the wilderness environment takes a little practice. Remember  to make your splint, functional, and comfortable. 

Some much needed springtime rain fell on our second day and boosted the river flows on the Trinity, contributing to 3 great days of swiftwater rescue training. It took a little encouragement to get everyone in the water, but all rose to the occasion and demonstrated some great rescue skills. This was a high energy group who learned a lot and had fun doing it. Highlights were running the rapid at Hawkins Bar and shallow water crossing the entire Trinity River using the 10 person wedge technique.

Entrapments, swiftwater rescue

Student prepares a stabilization line for entrapped victim. Willow Creek provided an excellent training site for entrapments

It was great to get back up to the Trinity River and spend some time training with the Hoopa TCCC. They have a great program going up there and we at Sierra Rescue are happy to continue working with the members of the Hoopa Tribe and TCCC. I’m bound for Arizona next  to teach a Wilderness Advanced First Aid class in Peach Springs, Arizona. –ZB 2.29.14

Webbing: It’s More Than Just a Flip Line

“If you don’t have what you need, improvise and make do.” River guide ingenuity, (RGI)  is a beautiful thing, and has helped many a guide out of a tight spot or two by making do with whatever he or she can find. In the guiding and swiftwater world the  “flip line” is one of those utility tools with many uses. Under some circumstances the flip line is good for re-righting boats, (as long as it’s long enough) but beyond that it has numerous ways to assist river guides and the problems they face. Your utility piece of webbing is the the swiftwater multi-tool. Check out these 30 things you can do with your utility piece of webbing other than flip rafts. Can you think of more?IMG_5933

1. re-right a flipped raft

2. use it like a throw rope, help someone to shore

3. clip to a tension diagonal and ride across (upstream arm, opposite the direction of travel)

4. drag your kayak to put-in (wear out plastic not your back)

5. make a quick anchor (3-bight or girth hitch)

6. make a NFPA anchor (wrap 3 pull 2)

7. create an improvised harness (swiss seat or other)

8. build a multi-point anchor on a raft or kayak

9. quick girth hitch of a thwart for a bomber anchor

10. tie a klemheist to attach to another rope

11. extend your reach from shore: attach one end to something / someone and hold the other

end while out in current

12. aid in climbing back in a boat

13. pre rig a bow to stern flip line on the bottom of a raft

14. improvise a kayak tow tether in a pinch

15. extract someone’s entrapped foot

16. be the human sea anchor to move a pinned boat: clip to a D-ring and jump in

17. create internal MA  via the vector pull to taco a pinned boat (change shape so it comes free)

18. in-boat directional pull for pinned raft (clip to a D-ring and pull)IMG_5931

19. add a bow line to a boat

20. use the interlocking double clove hitch to secure someone or something

21. have fun around camp: jump rope, tug-o war, blazo, slack-line

22. hanging line for drying gear

23. hammock anchor

24. bear hoist

25. dish line

26. line for tarp / shelter

27. a belt

28. splinting material

29. improvised litter for patient carry-out

30. attach gear to a tension diagonal and zip it across

Just so we’re all on the same page, the swiftwater multi-tool mentioned above, formerly known as a “flip line” is nothing more than a length of webbing between 15 ft and 30 ft tied together with a water knot and connected with a locking or auto lock carabiner. The water knot can be IMG_5936untied to double your working length.

I typically wear my webbing loop around my waist tucked up and under my drysuit sprayskirt tunnel. Start with the webbing loop in front of you, wrap it in opposite directions around your waist until the two ends (bights) come to meet in the front. Clip your carabiner to attach the two ends.  Be sure to keep it tight so it doesn’t hang loose or become an entrapment hazard. Adjust the water knot so the ‘belt’ fits snug. And there you have it, river guide’s multi-tool. What else can you do with it?

Post by: Zach Byars, Instructor

News from Sierra Rescue

2014: Off to a busy start!

Our New Year started with teaching a Wilderness First Responder course for the University of Southern California.

unnamed

This successful and high energy group has us excited for our next Wilderness First Responder in March!

unnamed

Click here for more information on upcoming WFR courses.

New Rescue Course!

Sierra Rescue is developing a new curriculum for the RiverRescue Certification. This new course, the River RescueCertification for the Professional (RRC-Pro) is certified and accredited by Rescue 3 International. More information coming soon!

unnamed-1

Rescue 3 Instructor Trainer Meeting and Rescue Training Academy

This fall Rescue 3 instructors from across the globe gathered in Sacramento, CA for the annual Instructor Trainer meeting and Technical Rescue Academy. There is so much talent and experience in Rescue 3 instructors! Here are some highlights:

unnamed

Boat Operations Course: Dick Rice from Alaska Rescue and James Reinheimer from Long Beach Fire Department MarineRescue taught a Motorized Boat Handling Course as part of the Technical Rescue Academy. We now teach Flood RescueBoat Operator (FRBO), Swiftwater Rescue Boat Operator (SRBO) and NIMS Rescue Boat Operator courses.

Click here for more information on upcoming courses.

unnamed

Rescue Swimmer course: As part of the Technical RescueAcademy we joined forces with Wimberley Rescue Training to do a Rescue Swimmer, Rescue Swimmer Advanced andRescue Swimmer Instructor Course. We now offer bothRescue Swimmer (RS) and Rescue Swimmer – Advanced (RS-A) courses!

Click here for more information on upcoming courses.

unnamed

Instructors of the Year Award! Julie and Abigail were both named Rescue 3 Instructor of the Year for 2013!

Instructor Corner:

Over the holidays is a time to re-charge our mind and body to prepare for another season of teaching rescue courses. Ever wonder what our instructors do in the “off” season.

unnamedunnamed-2unnamed-1


Julie and Abi caught some waves and relaxation in Mexico.

Don Taught a swiftwater rescue course for the US Air Force in December (brrr!) before heading off to the Virgin Islands

Zach is enjoying the powder in Jackson, WY that has been eluding the Sierras.

Its official, we moved!

unnamed-1 unnamedAt Sierra Rescue, we love our new Truckee location!