Author Archives: Abigail Polsby

River Safety Essentials from Tren Long

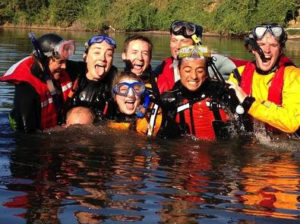
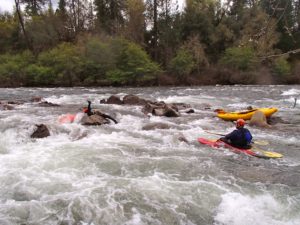
One of the most common questions I get, as a rescue instructor is: “What should I take with me on the water?”

This can be a very difficult question to answer on paper because I like my students to learn through the course of our weekend exactly what they need, but there are some fundamentals that should be covered.

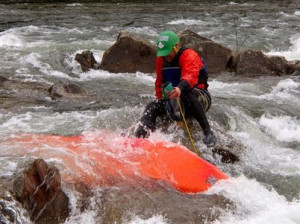
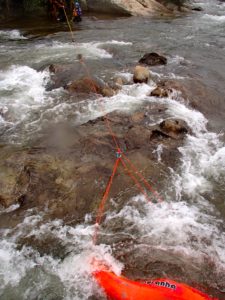
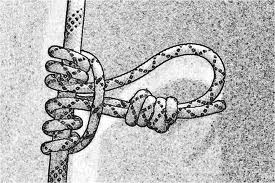
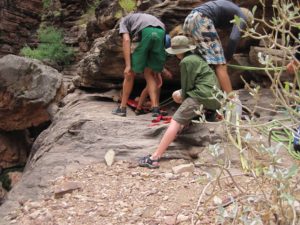
Throw Bag – a good rule of thumb is one throw bag per boat.  The type of boat you paddle often dictates what size rope you use in your throw bag; rafts carrying the larger diameter rope in longer lengths and kayakers carrying shorter thinner line to save space.  What is important to note about your throw bag is if you plan to use it as a haul line for mechanical advantage your brake prussic must be 2/3 or less the diameter of your haul line.

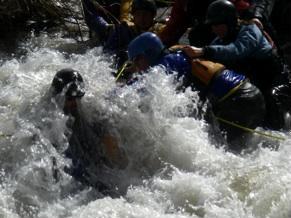
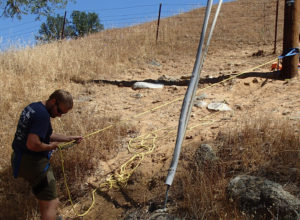
Haul line – If a boat gets wrapped you need a line to encourage the movement needed to get it off the rock.  This becomes very boat specific as kayaks can often use much smaller diameter rope as there is less water pressure on the smaller rigid hull.  Rafts have been pulled off rocks using throw bags but I recommend especially for multiday trips having 150-200 feet of 3/8-inch static line.954835_543961018999656_896179722_n

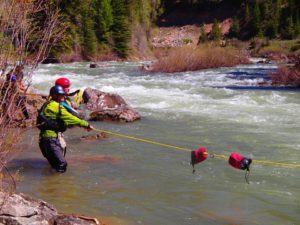
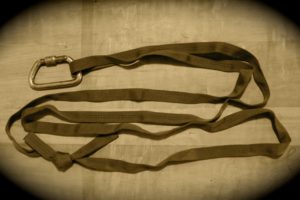
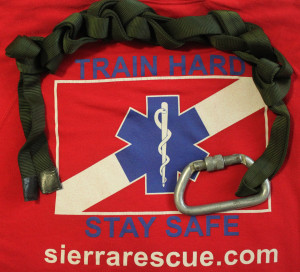
Carabiners – These tools make rope attachment a breeze, how many do you need?  For kayakers 2 per person is great, for rafters 3-4 per boat.  They must be locking carabiners, as unintentional clip-ins can be a very bad thing.

Prusik – To setup an efficient MA system you will need at least 2 prussic.  You can loop 2 short prussic and wear them around your waist or easily fit them in your lifejacket. 1-2 sets of prussic per group should be the norm.  Most important is that your prussic line is 2/3rd or less the diameter of your haul line!

Pulleys – Again following in the goal of efficient work the minimum of 1 prussic minding pulleys will make your life and rescue easier.  One per person in Kayaks is great and 2 per raft are ideal.

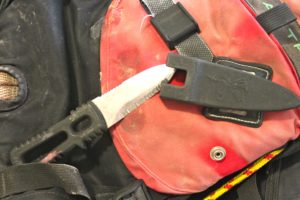
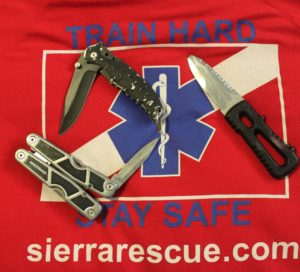
Knife – A good sharp river knife is important not only to cut tomatoes at lunch but could potentially save your life if you are bound in a rope in the water.  We do not use our knives to cut people out of pinned kayaks!  We do use them as a last resort to cut a rope if absolutely needed.

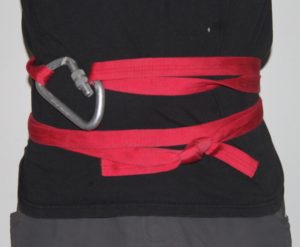
Webbing – Lastly and most often overlooked is webbing.  Depending on your river corridor anchors may be bountiful or hard to find but having enough webbing can overcome many obstacles.  I recommend 30ft per person kayakers and 80 feet per raft.  You can cut it how you like; I shoot for 15-20 feet per sling.

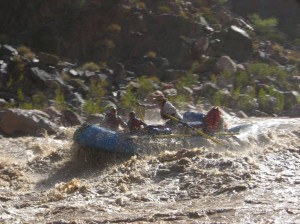
Is this a lot of gear? It depends on if you need it or not.  I can fit an entire wrap kit with a haul line in a container the same size as a 12 pack of beer, so what is more important on that 5 day trip, beers or being able to get your raft off that rock?

This is by no means an exhaustive list of what you need on the water, each group, each river, and each skill set dictates different equipment this is just some general guidelines I have found helpful for rafters and kayakers.

Post by: Tren Long, Instructor

Train Hard. Stay Safe. Kayak Specific River Rescue

OLYMPUS DIGITAL CAMERAClearly we are proponents of swiftwater rescue, not only because it is our livelihood, but because we believe that a well-trained boaters correspond to safer boaters, and safer boaters are less likely to need rescue. See the cycle? We are avid proponents of prevention. The best rescue is the one that never has to happen. Stay on top of your swiftwater skills, and better than than that,  train with the people you paddle with.

At Sierra Rescue we offer custom courses just for you and your boating group. Our River Rescue Certification (RRC) has had great success in the last 5 years and we have taken it a step further to offer the RRC-K; River Rescue Certification – Kayak Specific. In the course we take the basic RRC format and put a kayaker’s spin on it. It involves the same hands on scenario-based training, but emphasizes boat-based rescue  and self rescue for a kayaker, advanced pins and entrapments, and rope techniques using the gear in a personal pin kit. Running scenarios with the people who have your back on the water not only helps prepareOLYMPUS DIGITAL CAMERA the group for those “what ifs,” but lets you problem solve with one another and see each others rescue abilities.


Last year we taught numerous RRC-K with great response. Students really seemed to enjoy responding to scenarios from their boats, and and being able use the benefits of a kayak in a rescue. This article, written by CCK instructor Bryant Burkhadt, touches on the progression of swiftwater rescue training and the importance of continued training while discussing the benefits of a kayaker-specific course for boaters.

http://playak.com/news.php?idd=2337568845922

Thanks Bryant, see you on the water.OLYMPUS DIGITAL CAMERA

Post by: Zach Byars, Instructor


Learning the Ropes: Getting off the ground….and back down

IMG_0345On occasion during the dry-land rope portion of some swiftwater rescue courses I like to introduce vertical rope options. After demonstrating how to ascend a rope with a prusik and rappel with a muenter, I caution students saying,“Make sure you know how to properly tie a munter and be well-versed on the ground as to how to switch from your tight prusik to the munter in order lower back down.” Then I’ll jokingly add, “or keep a knife hand and pre-plan a soft landing.” This is usual good for a few laughs or at least a couple of smiles. Occasionally I’ll add, “at a very minimum, take a cell phone with you and  I can talk you through the transition…”

Here’s the rundown on minimal gear rope ascension and rappelling.  It is a useful skill for boaters during portage or for times when the obvious access methods aren’t an option. So many times we get tunnel vision on the horizontal  (river-level) access, and forget about the vertical options.prussik

Part one: getting up the rope

You all remember the rope climb from middle school; big rope, hands and feet, and a lot of effort? Thats the idea here but we get to add a progress capture device. Enter the prusik hitch. The prusik will travel up the rope with you and will ‘catch’ if you slip, as well as capture our progress up the rope (make sure it is tied to the rope you’re climbing and clipped to the carabiner on your improvised harness).

OLYMPUS DIGITAL CAMERAIf your feet have purchase on the ground they provide the force that lets you move up the rope. If you are in the vertical, then you need a way to take tension off the prusik you are hanging from so you can slide it up the rope. There are a few ways to do this. The most basic is to grab the rope below your prusik and wrap it around one of your feet a few times. As you stand up in this loop your prusik is loosened and you can slide it up the rope. Continue until you reach the top of the rope.

The second option is to attach a second prusik to the rope below the one attached to your harness, and stand in that prusik. As you stand, slide the prusik attached to your harness up the rope, then move your foot loop as well. Thus you ascend so on and so forth till you reach the top. Show that to your gym coach, just hope he doesn’t ask you to pass the knot. [patience young jedi, next lesson]

Part two: going down….

So there you are at the top of the rope, no knife, no soft landing, no cell phone, no ladder. Luckily you remembered how to tie your muenter. Here’s the crux. Once you tie your muenter and clip it to your harness, You need to take tension off your prusik so you can transition your weight to the muenter enabling you to rappel down the rope. I’d recommend doing this numerous times on the ground or with a partner who can lower you till you master this step.  Once the prusik is loosened you can lower your self to the ground. Dont forget to mind the prussik on your way down. That is to say grab in with your opposite (non brake) hand and slide the hitch down the rope as you descend. Not to fast, fast is hot, hot + rope = bad.

Another trick for your tool belt. This technique can help you or a friend of of a tight spot, or can let you access someone/ something from above or below. Minimum Gear required: 1 length of webbing long enough to make a harness. One carabiner  (to attach your improvised harness, and attach your prussik and or your munter hitch to your rope. A long strong length of rope to ascend / descend.

10 Tips for a Smooth Grand Canyon Trip

The mother of all multi-day river trips in the United States might be the Colorado River through the Grand Canyon.  Nowhere else can you get huge rapids, beautiful scenery, 20+ days in a remote river environment and amazing side adventures the whole way.  It really is amazing, and one of my personal favorite places to be in the entire world!

The author rows a gear boat through massive waves at Hermit Rapids.  The waves here have been known to be big enough to flip boats that don’t hit the waves straight on.

The author rows a gear boat through massive waves at Hermit Rapids. The waves here have been known to be big enough to flip boats that don’t hit the waves straight on.

That being said, an adventure of this scale has many risks involved.  I was lucky to go on my first Colorado River adventure with very experienced guides and people who love and care about the river and having great experiences.  Our adventure wasn’t without injuries or difficulty.  Our group was separated in a side canyon by a flash flood, one person was injured and required evacuation out of Upper Elves Chasm, one got heat exhaustion while on a hike and we had a few other smaller injuries.

From all of this, I learned some valuable lessons that can be used anywhere in the world on any adventure, but are particularly relevant to rescue and safety in the Grand Canyon:

1)   Have a trip leader who has experience in the Grand Canyon.  This will make everyones’ trip safer and better all around from their experience and good judgment.

2)  If the group splits to do a hike or other activity, make sure each remaining group has a “leader” or a plan for contingencies.

3)  Make sure the boats are tied up high and far from the edge of the river, and with multiple points at camp so they cannot float away even if the river went up 10k CFS overnight!

4)  “Raft” the boats together at camp by using short straps to rig each one side by side.  This creates a solid platform to load/ unload and minimizes injuries at camp on rafts.

A flash flood splits a group that was hiking Shinamu Wash near Bass Camp.  You can see victims stranded on the river left wall, as well as rescuers on river right.

A flash flood splits a group that was hiking Shinamu Wash near Bass Camp. You can see victims stranded on the river left wall, as well as rescuers on river right.

5)  Always keep the rafts together when on the river.  Keep others close by through rapids incase there is a rescue needed.  Divide your boats and equipment so things are relatively even weighted through the larger rapids.

6)  Rig to flip every day!  Even the smaller rapids in the Colorado can pack a big punch with large waves and powerful hydraulics!

7)  If its raining, or even a little cloudy in the sky, stay out of the side canyons.  Even canyons that are not prone to flash flooding can go up in and instant.  On multiple occasions I have seen the devastation of flooding and know how dangerous it can be to be stuck in one.

Trip members work together to evacuate a victim out of Upper Elves Chasm.  The rescue took more than two hours and involved moving an incapacitated victim down steep, rocky terrain and under rocky shelves like the one in the photo.  A paco pad and rope were essential to this rescue.

Trip members work together to evacuate a victim out of Upper Elves Chasm. The rescue took more than two hours and involved moving an incapacitated victim down steep, rocky terrain and under rocky shelves like the one in the photo. A paco pad and rope were essential to this rescue.

8)  Bring extra supplies like rope, a climbing harness, and rigging gear.  This is very helpful for exploring side canyons, and can be invaluable in a rescue situation.

9)  Always take water if you’re going more than 100 feet from the river.  The canyon is hot and unforgiving, especially to those who are not well prepared!

10)  Small medical needs like cuts, scrapes, bruises and dry skin can become big medical needs if not addressed as soon as they arise.  Take time to take care of these things as you go, and have a great trip down the canyon!

WAFA with HRR: Springtime in the Grand Canyon –

WAFA- Wilderness Advanced First Aid  with the  HRR – Hualapai River Runners in Peach Springs, AZ

Abi and I drove the Sierra Rescue rig down through Nevada across the Colorado River at Hoover Dam and into Peach Springs, AZ for two weeks of wilderness advanced first aid (WAFA) and swiftwater rescue training with the Hualapai River Runners. We’ve been running trainings for the Hualapai for quite some time now, and its always good to get back to the big ditch.

HRR WAFA  group shot

The group showing off their hypo wraps

WAFA: The group inside the warehouse, after arts and crafts with splints

The group inside the warehouse, after arts and crafts with splints

Wilderness first aid hypothermia wrap

All bundled up and warm in the hypo-wrap

WAFA skill: reducing a shoulder

That’s one way i wouldn’t advise reducing a shoulder

It was a great four days of WAFA (Wilderness Advanced First Aid Training). On the fourth day we finished the class with a big mass causality  incident involving a simulated train vs buss collision. Trauma! Moulage! Fun! Students had to triage and figure out some difficult extractions from the broken down bus where we staged the scenario. Weather was great, a gave us the first taste of spring.  Julie and Zach swapped places and Julie will join Abi along with a few flagstaff locals for the swiftwater rescue portion of the course which will involve 2 days of on-site  training and a downriver overnight from Diamond Creek to Pierce Ferry.  Load up those big blue pontoons and have a some fun!

Wilderness First Aid and Swiftwater Rescue with the Hoopa tribe

All 20 atop the raft

The USCG recommended passenger load may have been exceeded for this group shot! All 20 students atop the raft, on day two after a really fun day of swiftwater training. The Trinity River was flowing around 1100 CFS and made Hawkins Bar an ideal training site. Some fun features, and good challenging cross-river swims!

We had yet another great week of Wilderness First Aid and Swiftwater Rescue training up on the Trinity River with the TCCC of the Hoopa Tribe. We at Sierra Rescue have been doing a combination Wilderness First Aid / Survival and Swiftwater Rescue Course up in Hoopa for over 10 years now. Day one was all first-aid focused and the wounds lab and splinting lab were highlights as usual. Fun to see the students improvising in the wilderness setting. We spent the evening of the first day building survival shelters and running hands on wilderness first aid scenarios.  It was great to watch the students thinking  through the variety of problems we threw at them.

wilderness first aid; upper extremity splint

Wilderness First Aid Arts and Crafts: splint building. Building a splint in the wilderness environment takes a little practice. Remember  to make your splint, functional, and comfortable. 

Some much needed springtime rain fell on our second day and boosted the river flows on the Trinity, contributing to 3 great days of swiftwater rescue training. It took a little encouragement to get everyone in the water, but all rose to the occasion and demonstrated some great rescue skills. This was a high energy group who learned a lot and had fun doing it. Highlights were running the rapid at Hawkins Bar and shallow water crossing the entire Trinity River using the 10 person wedge technique.

Entrapments, swiftwater rescue

Student prepares a stabilization line for entrapped victim. Willow Creek provided an excellent training site for entrapments

It was great to get back up to the Trinity River and spend some time training with the Hoopa TCCC. They have a great program going up there and we at Sierra Rescue are happy to continue working with the members of the Hoopa Tribe and TCCC. I’m bound for Arizona next  to teach a Wilderness Advanced First Aid class in Peach Springs, Arizona. –ZB 2.29.14

Webbing: It’s More Than Just a Flip Line

“If you don’t have what you need, improvise and make do.” River guide ingenuity, (RGI)  is a beautiful thing, and has helped many a guide out of a tight spot or two by making do with whatever he or she can find. In the guiding and swiftwater world the  “flip line” is one of those utility tools with many uses. Under some circumstances the flip line is good for re-righting boats, (as long as it’s long enough) but beyond that it has numerous ways to assist river guides and the problems they face. Your utility piece of webbing is the the swiftwater multi-tool. Check out these 30 things you can do with your utility piece of webbing other than flip rafts. Can you think of more?IMG_5933

1. re-right a flipped raft

2. use it like a throw rope, help someone to shore

3. clip to a tension diagonal and ride across (upstream arm, opposite the direction of travel)

4. drag your kayak to put-in (wear out plastic not your back)

5. make a quick anchor (3-bight or girth hitch)

6. make a NFPA anchor (wrap 3 pull 2)

7. create an improvised harness (swiss seat or other)

8. build a multi-point anchor on a raft or kayak

9. quick girth hitch of a thwart for a bomber anchor

10. tie a klemheist to attach to another rope

11. extend your reach from shore: attach one end to something / someone and hold the other

end while out in current

12. aid in climbing back in a boat

13. pre rig a bow to stern flip line on the bottom of a raft

14. improvise a kayak tow tether in a pinch

15. extract someone’s entrapped foot

16. be the human sea anchor to move a pinned boat: clip to a D-ring and jump in

17. create internal MA  via the vector pull to taco a pinned boat (change shape so it comes free)

18. in-boat directional pull for pinned raft (clip to a D-ring and pull)IMG_5931

19. add a bow line to a boat

20. use the interlocking double clove hitch to secure someone or something

21. have fun around camp: jump rope, tug-o war, blazo, slack-line

22. hanging line for drying gear

23. hammock anchor

24. bear hoist

25. dish line

26. line for tarp / shelter

27. a belt

28. splinting material

29. improvised litter for patient carry-out

30. attach gear to a tension diagonal and zip it across

Just so we’re all on the same page, the swiftwater multi-tool mentioned above, formerly known as a “flip line” is nothing more than a length of webbing between 15 ft and 30 ft tied together with a water knot and connected with a locking or auto lock carabiner. The water knot can be IMG_5936untied to double your working length.

I typically wear my webbing loop around my waist tucked up and under my drysuit sprayskirt tunnel. Start with the webbing loop in front of you, wrap it in opposite directions around your waist until the two ends (bights) come to meet in the front. Clip your carabiner to attach the two ends.  Be sure to keep it tight so it doesn’t hang loose or become an entrapment hazard. Adjust the water knot so the ‘belt’ fits snug. And there you have it, river guide’s multi-tool. What else can you do with it?

Post by: Zach Byars, Instructor

River Knives: On the Cutting Edge

So here’s the deal with river knives . You need one. We’ll discuss what kind and how to wear it later. Inevitably at some point in your career in and around swiftwater you will need to use your river knife. I don’t mean to cut fruit at lunch or spread pb on sandwich. I mean need your knife. Rope entrapment and under-the-raft pins are two of the more severe scenarios in which I have seen the quick and efficient use of a river knife save lives.

IMG_5926 
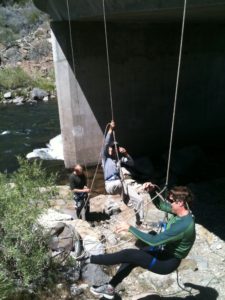
In our newly developed RRC-professional curriculum, one of the new ‘skills’ adapted from the Kiwi rescue realm centers on getting to and using a knife to self rescue under stressful conditions. The drill  involves putting your foot in a loop of rope, and lowering into the current. Once “entrapped,’ you have to reach your knife and cut your foot free. Don’t worry we wont have you cut yourself free of a raft floor, but as extreme as it sounds, doing exactly that should be considered as an option if someone is heads down under a pinned / wrapped raft. Remember it’s all about airway airway airway.IMG_5927

River knives, like a lot of gear we chose to use or wear in swiftwater comes down to personal preference. You should choose a knife that:

1) Stays attached and secure when you don’t need it. Remember this is 90+% of the time. Nothing worse than needing your knife only to realize that it fell off…

2) Doesn’t get in your way. We coil and stuff throwbags over the shoulder, and countless times I’ve seen rope get stuck around a knife handle. How about raft self-rescue with an exterior front-mounted upward facing fixed blade river knife? It will either pop off ($40 down the drink) or make your already challenging climb back in your boat much harder.

3) Has a tether? This one I can see this one both ways. If you’re really using your knife you don’t want to drop it, but you certainly want to make sure that your ‘tether’ doesn’t become an entrapment.IMG_5928

Over the years I’ve had varied success with several brands of river knife. Its less about the knife itself and more about where you put it. I like an exterior mounted knife because I know where it i  and it is quick to access. I have also gone to adding an additional folding lock-blade knife in the front pocket of my pfd with lightweight tether. Taking steps to secure your exterior mounted knife makes a big difference. I’ve seen velcro modifications, rubber bands, and tape used to keep the knives in place when you don’t want them out.

Keep in mind that you’re knife is a life-saving tool and needs to reserved for that use. Of course it can serve other purposes, but have one, and know where it is, because you never know when you’ll need it most.


Post by: Zach Byars, Instructor

News from Sierra Rescue

2014: Off to a busy start!

Our New Year started with teaching a Wilderness First Responder course for the University of Southern California.

unnamed

This successful and high energy group has us excited for our next Wilderness First Responder in March!

unnamed

Click here for more information on upcoming WFR courses.

New Rescue Course!

Sierra Rescue is developing a new curriculum for the RiverRescue Certification. This new course, the River RescueCertification for the Professional (RRC-Pro) is certified and accredited by Rescue 3 International. More information coming soon!

unnamed-1

Rescue 3 Instructor Trainer Meeting and Rescue Training Academy

This fall Rescue 3 instructors from across the globe gathered in Sacramento, CA for the annual Instructor Trainer meeting and Technical Rescue Academy. There is so much talent and experience in Rescue 3 instructors! Here are some highlights:

unnamed

Boat Operations Course: Dick Rice from Alaska Rescue and James Reinheimer from Long Beach Fire Department MarineRescue taught a Motorized Boat Handling Course as part of the Technical Rescue Academy. We now teach Flood RescueBoat Operator (FRBO), Swiftwater Rescue Boat Operator (SRBO) and NIMS Rescue Boat Operator courses.

Click here for more information on upcoming courses.

unnamed

Rescue Swimmer course: As part of the Technical RescueAcademy we joined forces with Wimberley Rescue Training to do a Rescue Swimmer, Rescue Swimmer Advanced andRescue Swimmer Instructor Course. We now offer bothRescue Swimmer (RS) and Rescue Swimmer – Advanced (RS-A) courses!

Click here for more information on upcoming courses.

unnamed

Instructors of the Year Award! Julie and Abigail were both named Rescue 3 Instructor of the Year for 2013!

Instructor Corner:

Over the holidays is a time to re-charge our mind and body to prepare for another season of teaching rescue courses. Ever wonder what our instructors do in the “off” season.

unnamedunnamed-2unnamed-1


Julie and Abi caught some waves and relaxation in Mexico.

Don Taught a swiftwater rescue course for the US Air Force in December (brrr!) before heading off to the Virgin Islands

Zach is enjoying the powder in Jackson, WY that has been eluding the Sierras.

Its official, we moved!

unnamed-1 unnamedAt Sierra Rescue, we love our new Truckee location!

NEW!! River Rescue Certification for the Professional

What is the River Rescue Certification-Pro (RRC-Pro)?

Mike Mather instructing a White water River Rescue Certification

RRC-Pro: An Internationally recognized water rescue certification that is written for Professional BOATERS, by Professional BOATERS. It is a fast paced, scenario based rescue course designed to develop the ability to choose good actions when a river rescue is necessary. This curriculum is for river guides and kayakers that spend a good portion of their lives on the river in a professional capacity, and therefore have a solid base of boating and basic rescue skills already. This energetic, and physical curriculum will be challenging and focused on quick reaction time with a thorough understanding of options and resources. The rescue skills testing component will emphasize knowing your own limits, skill level, knowledge of basic rope skills and the ability to execute a rescue as part of a team. The challenges of responding at night are highlighted in the night op. The task book at the end lays out easy ways to keep your water rescue certification current with continuing education and testing day options. This three day, intensive and comprehensive course takes professional rescue certification for the professional boater to a whole new level.

How does it differ from the River Rescue Certification?

kayak rescue clinic

RRC: A DYNAMIC water rescue course specifically written and designed for private boaters,

kayakers and non-profit organizations! Basic river skills are a prerequisite! Emphasis is on identifying hazards and on RESCUE itself; both of self and others. Thinking through rescues is also emphasized. This is the class you want as a boater to stay safe and know what to do if something goes wrong. Although this course meets agency Swiftwater Rescue certification requirements for river guides and kayakers; its pace allows for thorough integration of knowledge and practice of the skills that matter. The two day format makes the course more affordable and accessible. This course should be a prerequisite to anyone boating on any river anywhere! The course addresses the river rescue needs of rafters, cat boaters, kayakers, pack rafters, canoeists, riverboarders and SUP paddlers.

Who:

This curriculum is owned and developed by Sierra Rescue and is also certified and accredited by Rescue 3 International. While Sierra Rescue writes and updates the workbook, all Instructors contribute to its writing and maintenance.

Mission:

foot entrapment swift water rescue class

To provide a professional river rescue certification program that is engaging, exciting, challenging, fun and affordable for all participants, with a strong emphasis on safety and prevention of accidents; as well as appropriate response to a whitewater rescue emergency.

To be the best river rescue certification course available to professional river guides and kayakers world wide.

How:

All Instructors are well respected river professionals, as well as certified Rescue 3 International Water Instructors. The background in working with Agencies will assist in the interaction between the river rescuers on scene and the Agency personnel that may be needed to assist if medical attention is needed, or the river runners are unsuccessful in the rescue.

What is different from the RRC?

rescue class victim extraction

• The pace and intensity of the exercises. Everything in this rescue class will be designed to challenge folks that spend a good percentage of their time on the river. The physical exertion in the class will be much higher.

• Three days instead of Two days

• The addition of a night operation. It is important for river professionals on overnight trips to be able to respond in the dark. Understanding the challenges, and how to organize for success is critical, as well as knowing what extra items need to be on hand. This evolution may be a search, a swim, or both. It will be up to the Instructor based on the location of the rescue course, the weather, and the river flows.white water rescue instruction

• The addition of skills and performance evaluation. The objective here is to gain an assessment of a students ability to actually “perform” rescue skills. These include good access and assessment skills, as well as the ability to stabilize a scene and evacuate a patient. Emphasis is on both the actual skill set, and the students ability to know their own strengths and weaknesses; as this is what will be crucial in a water rescue.

This section will include swimming, self rescue into a boat, throw bagging, basic rope skills  and the ability to operate as part of a team.water rescue course in California

• The addition of a task book for re-certification and continuing education. The addition of the task book allows for constant re-certification through a variety of options including some on-line training, workshops, and yearly one day updates and refreshers. This will be very clearly defined in the rescue course and in the back of the workbook.

Who teaches it?

The Instructor requirements are extremely tough and require many years experience in both commercial and private boating, as well as professional rescue instruction. The following organizations are currently the only authorized providers:

Sierra Rescue – California, Nevada, Arizona: Julie Munger, Abigail Polsby, Don Lester and Zach Byars

Great Northern – Montana: Carl Motes-Connors

Mad River Boat Trips – Wyoming: KC Bess

Cascade Raft and Kayak – Idaho: Tren LongCascade Raft & Kayak Payette River, Idaho

Wet Planet – Washington and Oregon: Jonathan Blum

Jonathan Blum Rescue: Jonathan Blum

Nantahala Outdoor Center: Will Norris and Stephan Hart

Mather Rescue: Mike Mather

Rescue 3 Southeast: Todd Sanders

Raven Rescue – Canada: Ron Morrison & Jim Coffey

Nantahala Outdoor CenterRaven Rescue